You can use the Database Manager to add one or more database instances to a server that already has a Geo SCADA Expert server installed. The Geo SCADA Expert server that was first installed on the server is the 'original' or 'default' Geo SCADA Expert database server, and every Geo SCADA Expert database server that you add subsequently is a database instance. A database instance can run, and be configured, in the same way as any other Geo SCADA Expert server. (If you are unfamiliar with the concept of database instances, (see Running Multiple Geo SCADA Expert Servers on a Single Machine).
To add a database instance:
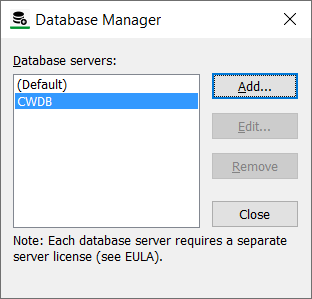
- Display the Database Manager.
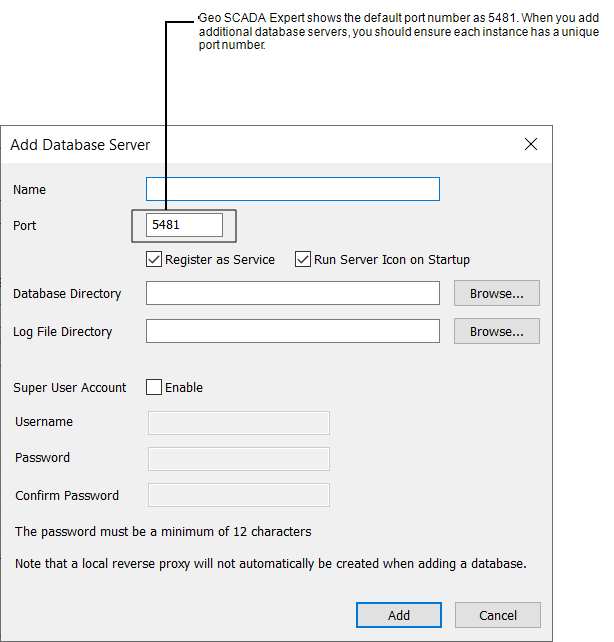
- Select the Add button to display the Add Database Server window.

- Define a unique Name for the new database instance.
- Enter the number of the TCP/IP Port on which the new database instance will listen for incoming connections. You should choose a TCP/IP port that is not already being used by other database instances (including the original Geo SCADA Expert database server).
If multiple servers are set to use the same port, the first server to start will use the port. The other servers will be unable to use the port and so will fail on startup.
This is important if you intend to create a set of permanent standby servers on a single system, for example as an offline test configuration.
-
If you want the new database instance to run automatically when Windows starts, select the Register as Service check box. When the database instance is registered as a Windows service, it runs on Windows startup and you can also start and stop it manually from the Windows Control Panel.
If you do not register the database instance as a Windows service, you will need to use a command line argument or the server icon to run the server (see Start a Database Instance Manually).
- If you want to add a server icon for the database instance, select the Run Server Icon on Startup check box. Geo SCADA Expert will show the server icon in the Windows system tray the next time that you log on to Windows. Geo SCADA Expert will also show the server icons for any other database instances and for the original Geo SCADA Expert server. The server icon provides quick access to various server features, including the Server Status Tool, Server Configuration Tool, and database log file.
If you decide that you do not want a server icon for the database instance, clear the Run Server Icon on Startup check box. As the server icon will not run automatically, you will need to use a command line to run it when you need to use its features (see Run the Server Icon for a Database Instance).
- Use the Database Directory field to define where the database for the new database instance will be stored. You can either enter the location of the database manually, or you can use the Browse button to navigate to the required location.
ATTENTION:To avoid one server overwriting the database of another, you need to choose a location that is not already used by another database instance.
- Use the Log File Directory field to define where the log files for the new database instance will be stored. Again, you can enter the location manually or use the Browse button and the location you choose should not be used by another database instance.
- If you want to create a Super User Account for this database instance, select the Super User Account check box and enter the following:
- Username—Enter a User Name for the Super User. This is the exact User Name you would need to enter to log on to Geo SCADA Expert as the Super User.
Password—Enter the password for the Super User. This is the exact password you would need to enter to log on to Geo SCADA Expert as the Super User. You have to specify a password that is at least 12 characters long. The password is case-sensitive. It is stored in encrypted format and is designed only to be decrypted by the server on which it was created.
Confirm Password—Re-enter the password to confirm it as the Super User password. Enter the same password as you entered in the Password field.
NOTICESECURITY THREAT
The Super User account has no restrictions and access to every part of the system, therefore unauthorized use of the account could compromise the security of the system.You should only allow authorized personnel to have access to the Super User’s user name and password.Failure to follow these instructions can result in equipment damage.For more information about the Super User account, see Super User Account in the Geo SCADA Expert Guide to Security.
-
Select the Add button to confirm your selections and create the new database instance. Alternatively, you can select Cancel to close the Add Database Server window without creating the database instance.
You have now added a Geo SCADA Expert database instance and it is listed on the Database Manager window.

After adding a Geo SCADA Expert database instance, you will need to:
- For each client that you want to connect to the new database instance, you need to configure a Client Connection (see Create a New ViewX Client to System Connection in the Geo SCADA Expert Guide to Client Administration).
NOTE:If the database instance is not using the default port, you need to change the port setting in the Client Connection. You do this in the Advanced Settings window (see Define the Port and Poll Timeouts and Intervals for a ViewX Client Connectionin the Geo SCADA Expert Guide to Client Administration).
- Use the Server Icon for the database instance to access the various server configuration features, including the License Details and the Server Configuration Tool. For information about running the Server Icon application, see Run the Server Icon for a Database Instance
If you have created multiple instances (servers) on one machine and you have multiple Server Icons you can use any of the icons to access the Server Configuration Tool.
- Configure the server settings for the new database instance in the same way as you would configure any other Geo SCADA Expert server. For details on how to configure the server settings, please refer to the Geo SCADA Expert Guide to Server Administration.